How to Remove SharkBite Fitting: A Step-by-Step Guide
SharkBite fittings have gained popularity in the plumbing industry for their ease of installation and versatility. However, there may come a time when you need to remove a SharkBite fitting for repairs, replacements, or modifications. Knowing how to properly remove these fittings is essential to avoid damaging the pipes or components. In this comprehensive guide, we will walk you through the step-by-step process of removing SharkBite fittings, ensuring a smooth and efficient disconnection.
1. Understanding SharkBite Fittings:
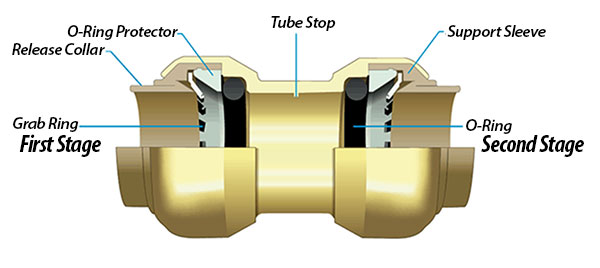
Before we dive into the removal process, let's have a basic understanding of SharkBite fittings. These innovative push-to-connect fittings are designed to create reliable connections without the need for soldering, gluing, or clamping. They consist of a brass body with a rubber O-ring and stainless steel teeth that grip onto the pipe for a secure fit.

SharkBite Fittings
2. Gathering the Necessary Tools:
To remove a SharkBite fitting, you will need a few tools at your disposal. These include a SharkBite Disconnect Clip, a pair of adjustable pliers, and a clean cloth or rag. Having these tools ready will make the removal process more efficient.
3. Turning Off the Water Supply:

Water Supply
Before attempting to remove any fittings, it is crucial to turn off the water supply to the area. Locate the main water valve or the valve specific to the section where the SharkBite fitting is installed. Turn the valve clockwise to shut off the water flow and relieve the pressure in the pipes.
4. Assessing the Fitting Type:
Identify the type of SharkBite fitting you need to remove. There are various types, including straight connectors, elbows, tees, and couplings. Each type may require a slightly different approach for removal, so it is essential to determine the specific fitting you are dealing with.
5. Using the Disconnect Clip:
SharkBite fittings can be removed using a specially designed Disconnect Clip. Insert the Disconnect Clip into the gap between the fitting and the pipe, ensuring that it fully engages with the release collar inside the fitting. Apply firm pressure and push the Disconnect Clip towards the fitting until it stops moving.
6. Releasing the Fitting:
While keeping the Disconnect Clip engaged, firmly pull the SharkBite fitting away from the pipe. The release collar inside the fitting should disengage from the pipe, allowing you to remove the fitting completely. If the fitting does not come off easily, wiggle it gently while pulling to loosen it.
7. Using Adjustable Pliers:
If you encounter difficulty removing the fitting with the Disconnect Clip alone, you can employ adjustable pliers for extra leverage. Grasp the fitting with the pliers and apply gentle rotational movements while simultaneously pulling it away from the pipe. Be cautious not to apply excessive force that could damage the pipe or fitting.
8. Cleaning the Pipe:
After successfully removing the SharkBite fitting, use a clean cloth or rag to wipe away any debris or residue on the pipe end. Ensure that the pipe is clean and smooth before installing a new fitting or making any necessary repairs.
9. Inspecting the Fitting:
Take a moment to inspect the removed SharkBite fitting for any signs of damage or wear. If the fitting appears worn or damaged, it is advisable to replace it with a new one to maintain the integrity of the plumbing system.
10. Reinstallation or Further Steps:
Depending on your specific needs, you may choose to reinstall a new SharkBite fitting, make repairs, or proceed with other plumbing tasks. Ensure that you follow the manufacturer's instructions for proper installation if you decide to use a new SharkBite fitting.
Knowing how to remove a SharkBite fitting is a valuable skill for any homeowner or DIY enthusiast. By following the step-by-step guide outlined above, you can safely and effectively disconnect SharkBite fittings without causing damage to the pipes or components. Remember to gather the necessary tools, turn off the water supply, and use the appropriate techniques for removing the specific type of fitting. With proper care and attention, you can successfully remove SharkBite fittings and proceed with your plumbing projects confidently.