How to Adjust Hunter Sprinkler Heads: A Step-by-Step Guide
Maintaining a lush and healthy lawn or garden requires efficient irrigation, and Hunter sprinkler heads are known for their quality and durability. To ensure your irrigation system operates at its best, knowing how to adjust Hunter sprinkler heads is essential. In this comprehensive guide, we'll take you through the steps to adjust these sprinkler heads, allowing you to achieve precise and effective watering for your landscape.

How to adjust hunter sprinkler heads?
I. Why Adjust Hunter Sprinkler Heads?
Understanding why it's crucial to adjust Hunter sprinkler heads is the first step toward a thriving landscape:
-
Coverage Optimization: Proper adjustment ensures that your lawn or garden receives adequate water coverage, preventing overwatering or underwatering.
-
-
Water Conservation: By fine-tuning your sprinkler heads, you can avoid water wastage and reduce utility bills.
-
-
Plant Health: Adjusted sprinkler heads deliver water where it's needed most, promoting healthier plants and turf.
II. Tools You'll Need
Before diving into the adjustment process, gather the following tools:
-
Screwdriver: Typically, a flat-head screwdriver is used for adjusting Hunter sprinkler heads.
-
-
Sprinkler Adjustment Key: Some Hunter models come with a specialized key for adjustments.
III. Adjusting Hunter Sprinkler Heads
Follow these step-by-step instructions to adjust your Hunter sprinkler heads effectively:
Step 1: Identify the Sprinkler Head Type
- Determine whether your Hunter sprinkler head is a fixed spray head or a rotating rotor.
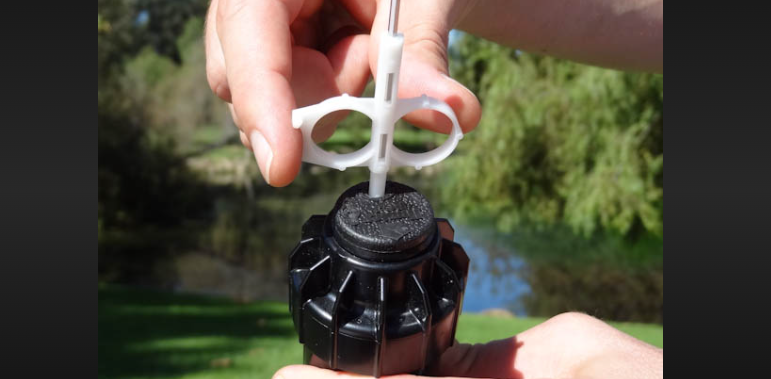
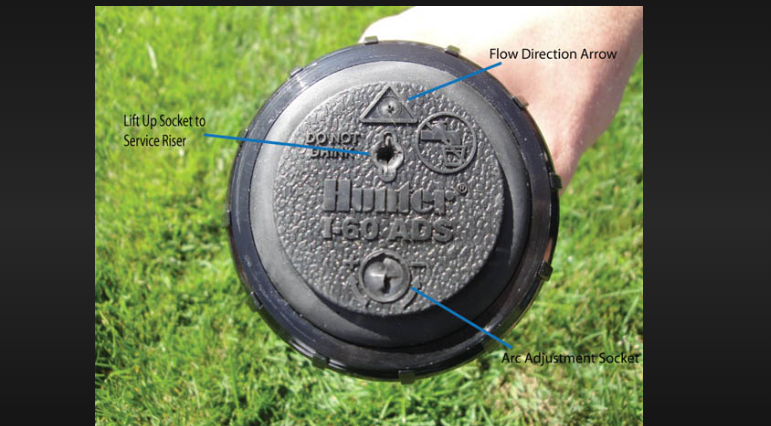
Step 2: Locate the Adjustment Screw
-
For fixed spray heads, find the radius adjustment screw on top of the nozzle.
-
-
For rotating rotor heads, look for the adjustment screw on the side of the sprinkler body.
Step 3: Adjust the Spray Pattern (Fixed Spray Heads)
- Turn the radius adjustment screw clockwise to decrease the spray radius and counterclockwise to increase it.
Step 4: Adjust the Arc (Rotating Rotor Heads)
- Rotate the adjustment screw to set the desired arc. Some models have adjustable arcs from 40 to 360 degrees.
Step 5: Test the Adjusted Sprinkler Head
- Turn on your irrigation system and observe the spray pattern to ensure it matches your lawn or garden's layout.
IV. Additional Tips
Consider these additional tips for optimal sprinkler head adjustment:
-
Check for Clogs: Before adjusting, inspect the nozzle for clogs or debris that may affect the spray pattern.
-
-
Regular Maintenance: Periodically inspect and clean your Hunter sprinkler heads to maintain their efficiency.
-
-
Consult the Manual: If you're unsure about adjustments, consult the manufacturer's manual for your specific Hunter sprinkler model.

Hunter sprinkler heads
Adjusting Hunter sprinkler heads is a straightforward process that can make a significant difference in the health and appearance of your landscape. By following this step-by-step guide and utilizing the right tools, you can achieve precise watering and maintain a vibrant outdoor space. Properly adjusted sprinkler heads not only conserve water but also contribute to the long-term vitality of your lawn or garden.