How to Delete Sold Listings on Poshmark: A Comprehensive Guide
Poshmark, a thriving online fashion marketplace, has revolutionized the way people buy and sell clothing and accessories. If you're a Poshmark seller, you may wonder how to efficiently manage your closet by deleting sold listings. In this article, we'll provide you with a detailed guide on how to delete sold listings on Poshmark, helping you keep your closet organized and appealing to potential buyers.
1. Why Deleting Sold Listings Matters
Managing your Poshmark closet is essential, and deleting sold listings offers several benefits:
1.1 Organization:
Removing sold items declutters your closet, making it easier for buyers to find available items.
1.2 Improved User Experience:
Buyers can have a smoother browsing experience when they focus on items they can purchase.
1.3 Inventory Control:
Deleting sold listings helps you track your available inventory and pricing more effectively.
delete sold listing on poshmark
2. A Step-by-Step Guide to Deleting Sold Listings on Poshmark
Follow these clear steps to remove sold listings from your Poshmark closet:
2.1 Open the Poshmark App:
Ensure you have the Poshmark app installed on your mobile device, and log in to your account.
2.2 Access Your Closet:
Tap on the "Sell" icon at the bottom center of the app's navigation bar. You will be taken to your closet, displaying all your listings.
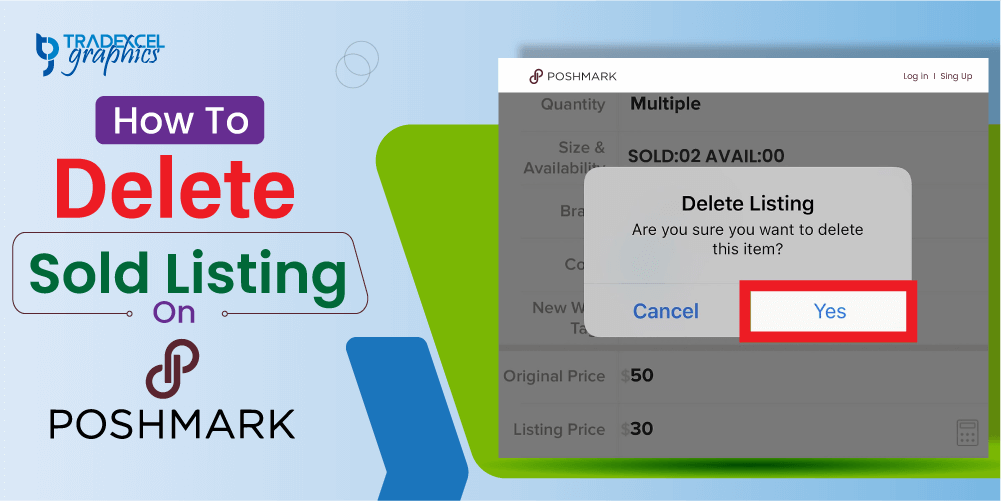
2.3 Locate the Sold Listing:
Scroll through your closet to find the item you've sold and want to delete. Sold listings are usually marked with a "Sold" banner.
2.4 Tap on the Listing:
Tap on the sold listing you wish to remove to access its details.
2.5 Select "Edit Listing":
In the listing details screen, tap on the "Edit Listing" button, typically found near the top right corner of the screen.
delete sold listing on poshmark
2.6 Scroll Down to "Availability":
While editing the listing, scroll down to the "Availability" section, where you'll see a toggle switch labeled "Not For Sale."
2.7 Activate "Not For Sale":
Toggle the switch to "Not For Sale." By doing this, you indicate that the item is no longer available for purchase, effectively removing it from your active listings.
2.8 Save Your Changes:
Scroll to the bottom of the editing options and tap the "Save" button to confirm your changes. Poshmark may prompt you to confirm that you want to mark the item as not for sale. Confirm this action.
2.9 Verification:
For added security, Poshmark may ask for your password or use a verification method to confirm the changes.
2.10 Sold Listing Status:
Once you've completed these steps, the sold listing will disappear from your active listings and will be relocated to the "Past Purchases" section of your closet.
Deleting sold listings on Poshmark is a straightforward process that enhances the organization and visual appeal of your closet. By marking sold items as "Not For Sale," you ensure that potential buyers can easily navigate your available inventory. This practice is crucial for successful Poshmark sellers, contributing to a positive shopping experience for your customers and a well-managed closet for you. Keeping your Poshmark closet organized not only benefits your sales but also enhances your overall experience on this bustling fashion platform.