Boosting Your Mic Volume on TeamSpeak 3: A Comprehensive Guide
TeamSpeak 3, a popular voice communication platform, is widely used for online gaming, remote collaboration, and virtual meetings. Clear and audible communication is crucial, and adjusting your microphone volume plays a significant role in achieving that. This article serves as your go-to guide for effectively turning up your microphone volume on TeamSpeak 3, ensuring that your voice resonates with clarity and impact.

How to turn up your mic volume on teamspeak 3?
1. The Importance of Optimal Mic Volume:
Whether you're coordinating strategies in an intense gaming session or participating in a critical business meeting, having your voice heard clearly is paramount.
Adjusting your microphone volume appropriately ensures that your words are crisp and distinct, contributing to effective communication and collaboration.
2. Step-by-Step Guide: Boosting Your Mic Volume on TeamSpeak 3:
Adjusting your microphone volume on TeamSpeak 3 involves a few simple steps. Follow this comprehensive guide to ensure your voice comes through loud and clear:
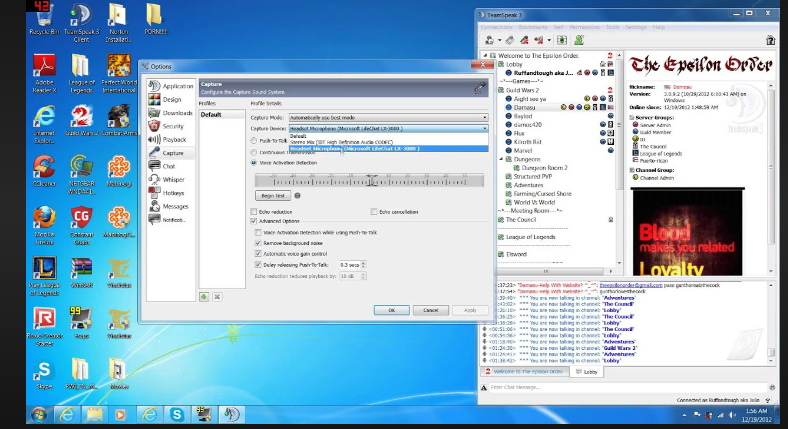
Step 1: Accessing the Capture Settings:
- Launch TeamSpeak 3 and connect to a server.
- In the top menu, click on "Settings" and then select "Options."
- In the left sidebar, click on "Capture."
Step 2: Selecting Your Microphone:
- Under "Capture Device," choose the microphone you want to adjust. Make sure your desired microphone is selected from the dropdown menu.
Step 3: Adjusting the Mic Volume:
- Locate the "Capture Volume" slider. This slider controls the input volume of your microphone.
- Slide the "Capture Volume" slider to the right to increase the microphone volume. Slide it to the left to decrease the volume.
Step 4: Testing Your Mic Volume:
- Below the "Capture Volume" slider, you'll find a "Test Your Microphone" section.
- Speak into your microphone at a normal volume and observe the "Voice Activation Level" bar.
- Adjust the "Voice Activation Level" slider until your voice activates the microphone without any distortion or clipping.
Step 5: Applying and Saving Changes:
- Once you've adjusted the microphone volume and activation level to your satisfaction, click the "Apply" button.
- To ensure that your changes are saved for future sessions, click the "OK" button.
3. Bonus Tip: Mic Technique for Optimal Results:
While adjusting the microphone volume in TeamSpeak 3 is crucial, using proper mic technique can further enhance the clarity of your voice. Here are a few tips:
- Distance: Maintain an optimal distance from the microphone. Being too close can cause distortion, while being too far can result in a weak signal.
- Position: Position the microphone slightly below your mouth to minimize plosives and breath sounds.
- Background Noise: Minimize background noise by using a noise-canceling microphone or by ensuring a quiet environment during communication.
4. Troubleshooting: Overcoming Common Challenges:
While adjusting your microphone volume is generally straightforward, you might encounter a few challenges along the way. Here's how to troubleshoot some common issues:
- Distortion: If your voice sounds distorted or crackling after adjusting the volume, try reducing the "Capture Volume" slider slightly until the distortion disappears.
- Background Noise: If you notice excessive background noise, consider using noise reduction software or adjusting your physical environment to minimize noise interference.

Turn up your mic volume on teamspeak 3
In the realm of online communication, ensuring that your voice is heard clearly is essential. TeamSpeak 3 provides the tools to adjust your microphone volume, allowing you to fine-tune your communication experience. By following this step-by-step guide and incorporating proper mic technique, you can confidently engage in gaming, collaboration, and meetings, knowing that your voice will resonate with clarity and impact. Whether you're strategizing with teammates or conveying important information, your amplified voice on TeamSpeak 3 will undoubtedly make a lasting impression.