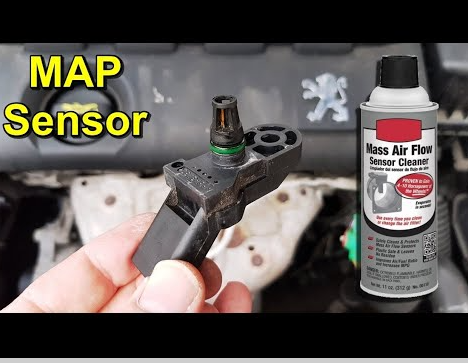
How to Clean a Map Sensor: A Step-by-Step Guide to Improve Engine Performance
The Manifold Absolute Pressure (MAP) sensor is a crucial component in modern automotive engines. It monitors the intake manifold's pressure and provides essential data to the engine control unit (ECU) to adjust air-fuel mixture and ignition timing for optimal performance. Over time, the MAP sensor can accumulate dirt, carbon deposits, and oil residues, leading to inaccurate readings and reduced engine efficiency. In this comprehensive guide, we will walk you through the step-by-step process of cleaning the MAP sensor, ensuring your engine runs smoothly and efficiently.

N55 MAF & MAP sensor cleaning
1. Understanding the Importance of a Clean MAP Sensor
A clean MAP sensor plays a vital role in maintaining the engine's performance and fuel efficiency. When the sensor is dirty, it may provide incorrect data to the ECU, causing issues such as:
a. Poor Fuel Economy: Inaccurate sensor readings can lead to a rich or lean air-fuel mixture, resulting in decreased fuel efficiency.
b. Rough Idle: A dirty MAP sensor can cause an unstable idle, leading to engine stalling or rough idling.
c. Engine Hesitation: Incorrect sensor readings may cause hesitation during acceleration, affecting the engine's responsiveness.
d. Check Engine Light: A contaminated MAP sensor can trigger the check engine light, indicating a problem that requires attention.
2. Preparing for the Cleaning Process
Before cleaning the MAP sensor, gather the necessary tools and materials:
a. Safety Gear: Wear protective gloves and safety glasses to shield your hands and eyes from any potential debris.
b. Cleaning Solution: Obtain a suitable sensor-safe cleaning solution or electronic parts cleaner.
c. Screwdriver: Depending on the sensor's location, you may need a screwdriver to access it.
d. Soft Brush: Have a soft-bristled brush or cotton swabs on hand to delicately clean the sensor.
3. Locating the MAP Sensor
The MAP sensor's location varies depending on the vehicle's make and model. Typically, it can be found near the intake manifold or throttle body. Refer to your vehicle's service manual or online resources to identify the exact location of the MAP sensor in your car.
4. Cleaning the MAP Sensor
Follow these step-by-step instructions to clean the MAP sensor effectively:
a. Step 1: Disconnect the Battery
Before starting the cleaning process, disconnect the negative terminal of the car battery to ensure safety and prevent electrical mishaps.
b. Step 2: Access the MAP Sensor
If necessary, use a screwdriver to remove any components or covers that obstruct access to the MAP sensor.
c. Step 3: Remove the MAP Sensor
Gently disconnect the electrical connector and any vacuum hoses attached to the MAP sensor. Carefully remove the sensor from its mounting.
d. Step 4: Inspect the Sensor
Examine the MAP sensor for visible dirt, debris, or oil residues. Use a soft brush or cotton swabs to remove loose particles.
e. Step 5: Clean the Sensor
Apply the sensor-safe cleaning solution or electronic parts cleaner to the sensor's exposed components. Use gentle brushing or swabbing to clean away stubborn dirt and residues.
f. Step 6: Allow Drying Time
After cleaning, allow the sensor to air dry completely. Avoid using compressed air or heat sources, as they may damage sensitive components.
g. Step 7: Reinstall the MAP Sensor
Once the sensor is dry, carefully reinstall it into its original position. Reattach the electrical connector and vacuum hoses.
h. Step 8: Reconnect the Battery
Reconnect the negative terminal of the car battery, ensuring a secure connection.
5. Testing the Cleaned MAP Sensor
After cleaning and reinstalling the MAP sensor, start the engine and let it idle for a few minutes. Observe the engine's performance and listen for any irregularities. Take the vehicle for a test drive to ensure proper functioning.
6. When to Clean the MAP Sensor
Cleaning the MAP sensor is not a routine maintenance task. It should be done when you notice symptoms of a contaminated sensor, such as poor fuel efficiency, rough idling, or engine hesitation. Additionally, if the check engine light is illuminated and the diagnostic trouble code points to the MAP sensor, cleaning might resolve the issue.
7. Professional Assistance
If you are unsure about the cleaning process or if the symptoms persist even after cleaning, consider seeking professional assistance. A qualified mechanic can thoroughly inspect the sensor, identify any underlying issues, and perform the necessary repairs or replacements.

Clean map sensor
A clean MAP sensor is crucial for maintaining optimal engine performance and fuel efficiency. By following this step-by-step guide, you can safely and effectively clean the MAP sensor, improving your vehicle's overall performance. Regular maintenance and cleaning of the MAP sensor will ensure your engine runs smoothly and efficiently, keeping your car running at its best. Remember to wear safety gear and consult a professional if you encounter any difficulties during the cleaning process.