How to Delete Read-Only Contacts on iPhone: A Comprehensive Guide
Managing contacts on an iPhone is an essential part of staying organized and connected. However, you may encounter read-only contacts that prevent you from making changes or deleting them directly. These read-only contacts can be frustrating, but there are effective methods to handle them. In this article, we present a comprehensive guide on how to delete read-only contacts on an iPhone, allowing you to streamline your contacts list and regain full control over your address book.
The Iphone
1. Understanding Read-Only Contacts on iPhone:
a. Read-Only Contacts Explained: Read-only contacts are entries in your address book that you cannot edit or delete due to sync settings or account restrictions.
b. iCloud Sync: Contacts synced from iCloud or other accounts may be set to read-only to prevent accidental deletions.
2. Identifying Read-Only Contacts:
a. Check for Icons: Read-only contacts may display a lock or cloud icon next to their names, indicating they are synced and protected from editing.
b. Edit Restrictions: Attempt to edit the contact; if you cannot make changes, it is likely a read-only entry.
3. Deleting Read-Only Contacts Manually:
a. Duplicate Contacts: If you have duplicate read-only entries, consider manually deleting them one by one.
b. Editing Restrictions: For contacts with read-only restrictions, try to locate the original source of the contact (e.g., iCloud, Google, etc.).
4. Deleting Read-Only Contacts from iCloud:
a. iCloud Settings: Access your iPhone's Settings and tap on your Apple ID/iCloud profile.
b. iCloud Contacts: Find and enable the "Contacts" toggle to synchronize your contacts with iCloud.
c. Delete Read-Only Contacts: Once synced, go to iCloud.com on a computer, sign in, and manually delete read-only contacts from the web interface.
5. Managing Read-Only Contacts from Other Accounts:
a. Google Contacts: For contacts synced with a Google account, log in to contacts.google.com on a computer and remove read-only entries.
b. Exchange or Outlook: If using Exchange or Outlook, access the respective account's web interface to manage read-only contacts.
6. Using Third-Party Contact Management Apps:
a. Third-Party Solutions: Several apps are available on the App Store to manage contacts effectively.
b. Contact Cleanup: Consider using apps that specialize in finding and deleting duplicate and read-only contacts.
7. Resetting Contacts Sync:
a. Disable Contacts Sync: If the read-only contacts persist, disable contacts sync for affected accounts temporarily.
b. Restart iPhone: After disabling sync, restart your iPhone to clear any sync-related issues.
c. Re-enable Contacts Sync: Turn contacts sync back on for the account and check if read-only contacts are resolved.
8. Exporting and Importing Contacts:
a. Exporting Contacts: Export your contacts to a VCF or CSV file from your iPhone or accounts' web interfaces.
b. Deleting and Re-importing: Delete all contacts, including read-only entries, and then re-import the cleaned contact list from the file.
9. Contact Cleanup Apps:
a. Third-Party Apps: Explore the App Store for contact cleanup apps that can help identify and manage read-only contacts.
b. App Reviews: Read user reviews and ratings to choose a reliable app that suits your needs.
10. Regular Contact Maintenance:
a. Regular Cleanups: Schedule periodic contact cleanups to remove duplicates, outdated entries, and potential read-only contacts.
b. Back Up Contacts: Before making significant changes, always back up your contacts to avoid accidental data loss.
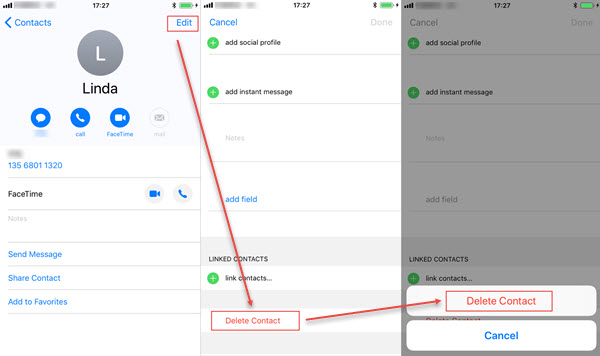
Delete contact on iphone
Dealing with read-only contacts on an iPhone can be a frustrating experience, but with the right approach, you can efficiently manage and delete them. By using manual methods, resetting sync settings, or utilizing third-party contact management apps, you can regain control over your contacts list and ensure it stays organized and up-to-date. Regular contact maintenance is essential to keep your address book clean and manageable, enhancing your overall iPhone experience and streamlining communication with your contacts. Remember to back up your contacts before making significant changes and explore the App Store for reliable apps that can assist with contact cleanup.