How to Cancel Amazon Flex Block: A Step-by-Step Guide
Amazon Flex is a popular platform that allows individuals to earn money by delivering packages for Amazon. However, there may be instances when you need to cancel a scheduled delivery block for various reasons. In this comprehensive guide, we will walk you through the process of canceling an Amazon Flex block, step by step. By following these instructions, you will be able to effectively manage your delivery schedule.
1. Log in to Your Amazon Flex Account:
Log in to Your Amazon Flex Account
To begin the cancellation process, log in to your Amazon Flex account using your credentials. Ensure that you have your username and password ready before proceeding to the next step.
2. Navigate to the Delivery Blocks Section:
Navigate to the Delivery Blocks Section
Once you're logged in, locate the "Delivery Blocks" section on the Amazon Flex website or mobile app. This section is where you can view and manage your scheduled blocks.
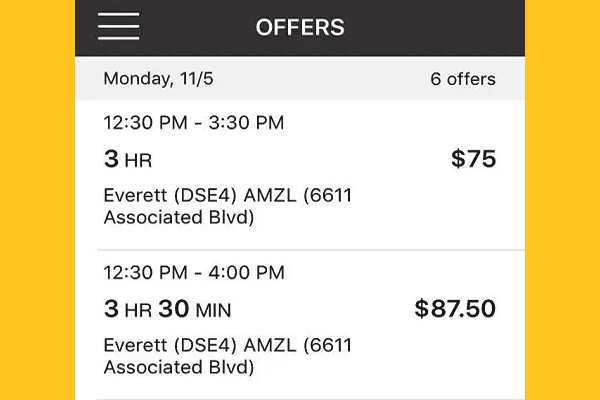
3. Identify the Block to Cancel:
In the Delivery Blocks section, identify the specific block that you wish to cancel. You should be able to see details such as the date, time, and duration of the block. Take note of this information for reference during the cancellation process.
4. Click on the Block to Access Options:
Click on the block that you want to cancel. This will open a page with various options related to the block, including cancellation.
5. Choose the Cancel Option:
On the block's page, look for the cancellation option. It is usually labeled as "Cancel Block" or something similar. Click on this option to proceed with canceling the selected block.
6. Confirm the Cancellation:
After selecting the cancellation option, a confirmation dialog box will appear. Confirm your decision to cancel the block by clicking on the "Confirm" or "Yes, Cancel" button. Be sure to double-check the details to ensure that you are canceling the correct block.
7. Review Cancellation Details:
Once the cancellation is confirmed, a confirmation message will appear, indicating that your block has been successfully canceled. Take a moment to review the cancellation details, which may include any penalties or implications associated with canceling the block.
8. Adjust Your Schedule if Needed:
If you canceled a block due to unforeseen circumstances, it might be necessary to make adjustments to your delivery schedule. Navigate back to the Delivery Blocks section to check for any available blocks that you can pick up to replace the canceled one.
9. Contact Support if Necessary:
If you encounter any issues or have further questions regarding the cancellation process, it's advisable to contact Amazon Flex support. They will be able to provide assistance and guide you through any complications you may face.
Canceling an Amazon Flex block is a straightforward process that can be done through your Amazon Flex account. By following the step-by-step guide provided above, you should be able to cancel your scheduled block quickly and efficiently. Remember to review any penalties or implications associated with cancellations and consider making necessary adjustments to your delivery schedule if needed. If you require further assistance, don't hesitate to reach out to Amazon Flex support for additional guidance.