How to Change Car on Waze: A Comprehensive Guide
Waze is a popular navigation app used by millions of drivers worldwide. It offers various features to enhance the driving experience, including the ability to customize your car icon on the map. In this article, we will provide a step-by-step guide on how to change your car on Waze, allowing you to personalize your driving experience and stand out on the road.

How to Change Car on Waze
1. Understanding Waze Car Icons:
Before we delve into the process of changing your car on Waze, it's essential to familiarize yourself with the different car icons available.
Waze offers a wide range of options, including sedans, SUVs, trucks, motorcycles, and even unique choices like the Ghostbusters' Ecto-1 or the Batmobile.
2. Updating Waze to the Latest Version:
To ensure you have access to all the latest features and options, it's crucial to keep your Waze app updated.
Check your device's app store for any available updates and install them before proceeding with the car change process.
3. Accessing the Waze App Settings:
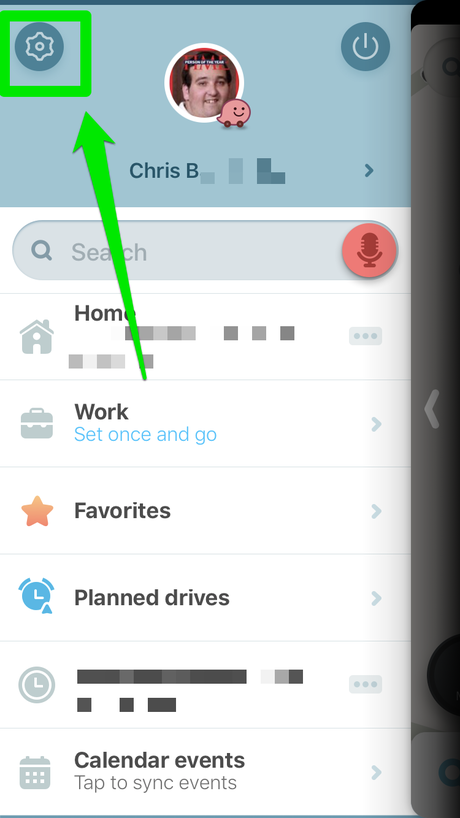
Launch the Waze app on your mobile device and tap on the magnifying glass icon at the bottom-left corner of the screen.
This will open the search menu. Next, tap on the gear icon located in the top-left corner of the screen. This will take you to the Waze app settings.
4. Navigating to the Display Settings:
Once you're in the Waze app settings, scroll down until you find the "Display & map" section. Tap on it to access the display settings.
5. Changing Your Car Icon:
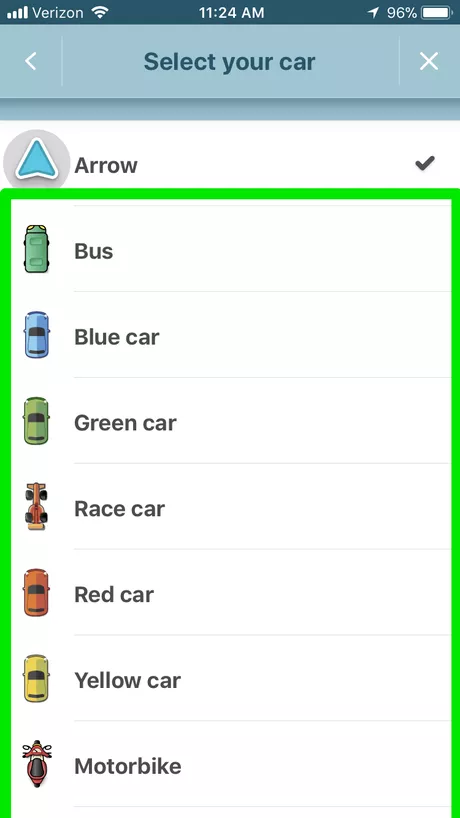
Within the display settings, you will find an option called "Car on map." Tap on this option to proceed to the car icon selection screen. Here, you will see a variety of car icons to choose from.

How to Change Car on Waze
6. Browsing and Selecting Car Icons:
Swipe left or right to browse through the available car icons.
As you swipe, you'll notice different categories such as "All," "Cars," "Sports," "Movies," and more.
Tap on a category to filter the available options. Once you find a car icon that suits your preference, tap on it to select it.
7. Customizing Car Colors:
After selecting a car icon, you can further customize it by changing the color.
Tap on the paint palette icon located below the car icons to access the color options.
Swipe left or right to view different color choices, and tap on a color to apply it to your car icon.
8. Confirming Your Selection:
Once you've chosen your desired car icon and color, tap on the "OK" or "Save" button to confirm your selection.
The Waze app will save your changes, and you will see your newly selected car icon on the map during your next navigation session.
9. Additional Tips and Considerations:
- Remember that changing your car icon on Waze does not affect the actual car you drive in real life. It is purely a visual representation within the app.
- If you want to revert to the default car icon, simply follow the same steps mentioned above, and select the original car icon option.
- Waze frequently updates its collection of car icons, so check back periodically for new additions or limited-time options.
Personalizing your Waze experience by changing your car icon is a fun and straightforward process. By following the steps outlined in this guide, you can select a car icon that reflects your style and preferences. Enjoy driving with a customized car icon on the Waze map and stand out among other users on the road. Safe travels!